Cookery Classes, Food, radio, Recipes

Start your day the romantic way

We’re all in need of a little spoiling at the moment so for Valentine’s Day why not make an extra special breakfast treat for someone, or indeed for yourself

You might have heard me talking about romantic cooking with Will Faulkner on Midlands 103 during the week. Well as promised, here’s how you can make a delicious romantic breakfast of heart shaped French toast stuffed with chocolate sauce …..

heart toast with white chocolate

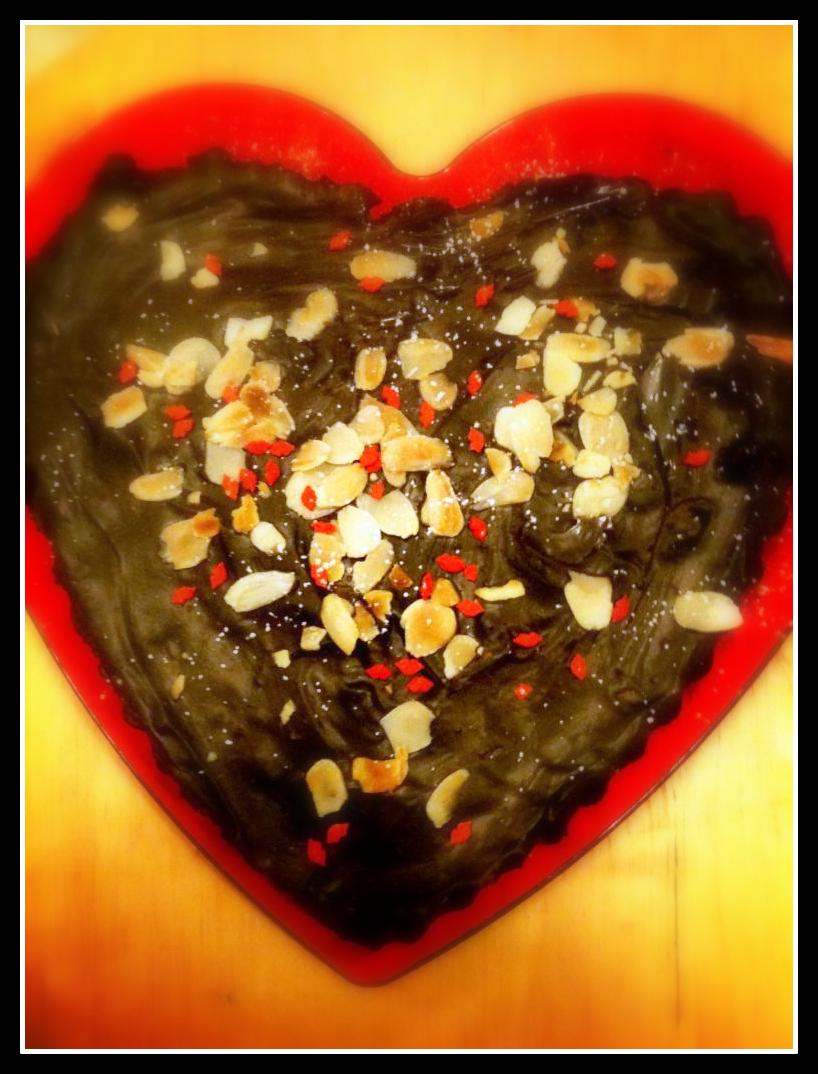
To make things easier on yourself I recommend that you make the chocolate spread in advance. Trust me, it’s much better than any well known brand 😉

What you need:

  • 125g cream
  • 35g sugar
  • 75g dark chocolate, chopped or in callets
  • 100g bar hazelnut chocolate, chopped

What you do:

  • To make the spread, heat the cream and the sugar together in a small saucepan. Careful, don’t allow it to boil.
  • Place both chocolates in a bowl and pour the warm cream over it.
  • Whisk until you have a smooth chocolately mix. Allow to cool.

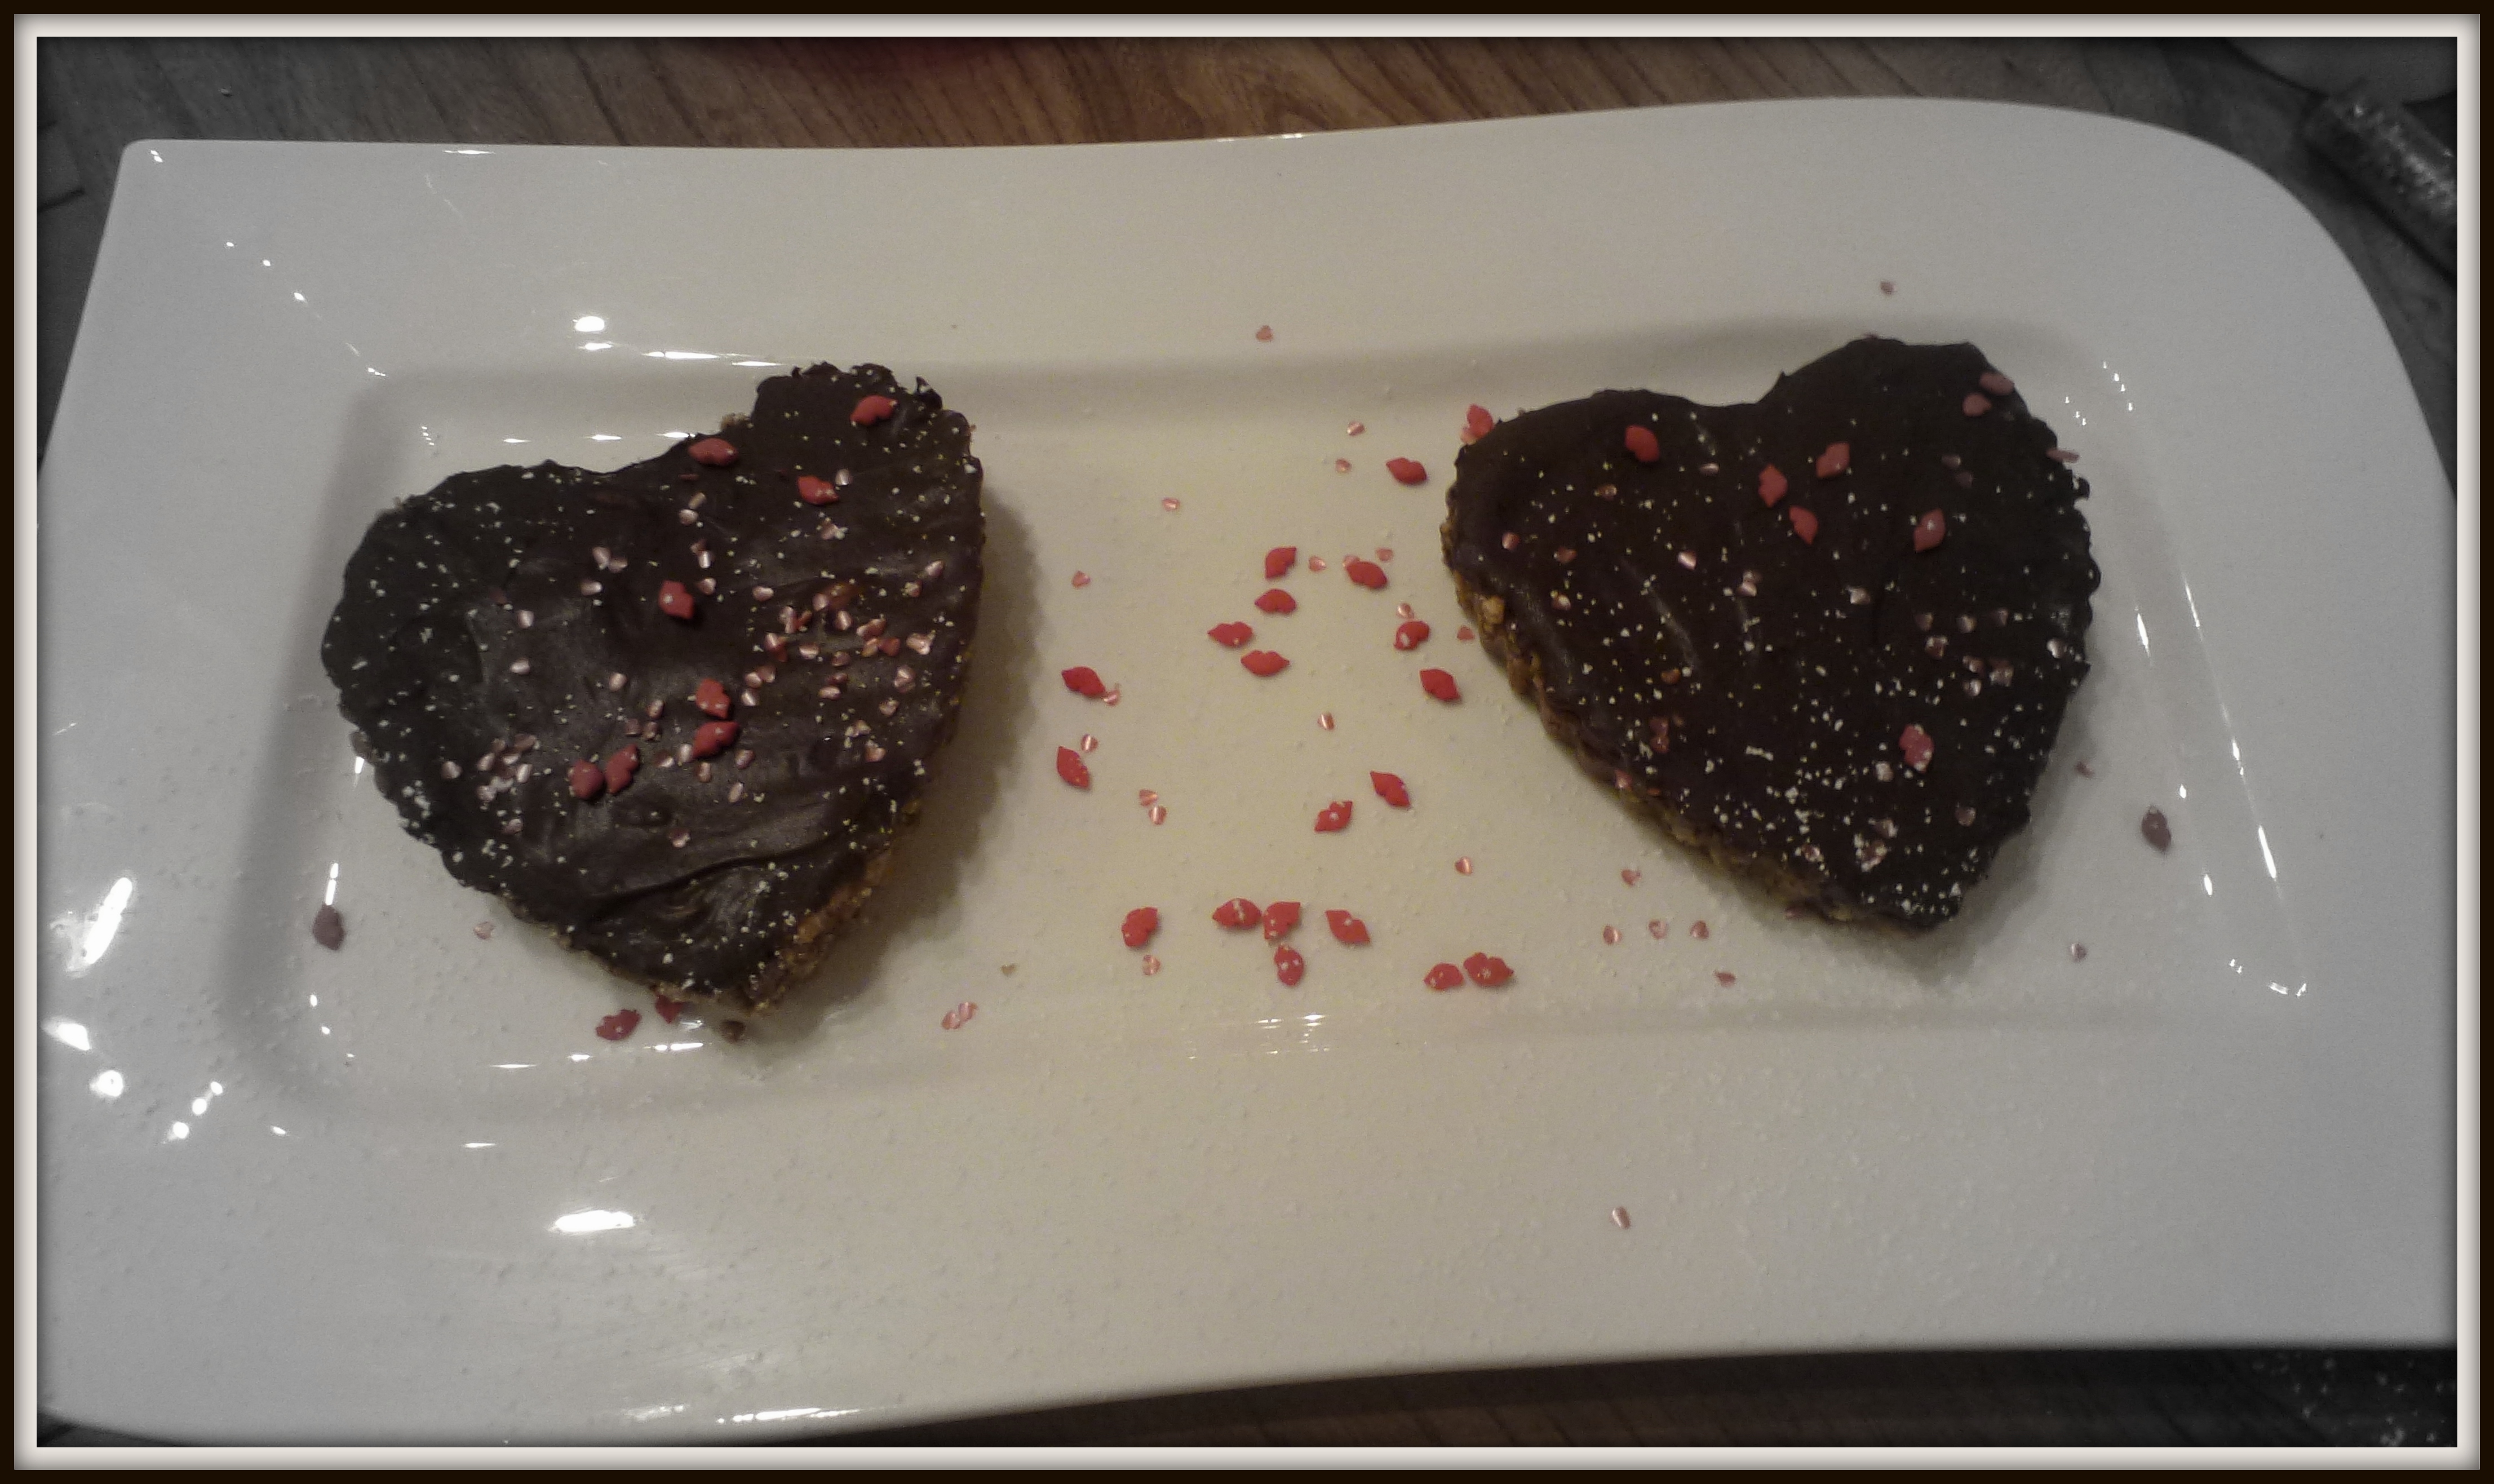
Once your chocolate spread has cooled you’re ready to make the french toast and assemble your dish. You will need:

  • 4 slices bread – preferably brioche
  • 1 egg
  • 75 ml milk
  • 1 tsp vanilla extract
  • 1 tbsp. caster sugar
  • 25 g butter
  • Icing sugar
  • Toasted hazelnuts and raspberries to serve

What you do:

  • Whisk the egg, milk, vanilla and sugar together in a wide bowl.
  • Using a heart shaped cutter , cut out the centre of each slice of bread.
    Spread chocolate on two of the slices and then top each with the other pieces ie you will have two sandwiches!
  • Press the edges together to prevent the spread leaking out
  • Dip each of the sandwiches into the egg mixture and allow to sit for a minute on each side to soak up mix.
  • Heat the butter in large frying pan, add the sandwiches and cook for 1-2 minutes on each side until golden brown.
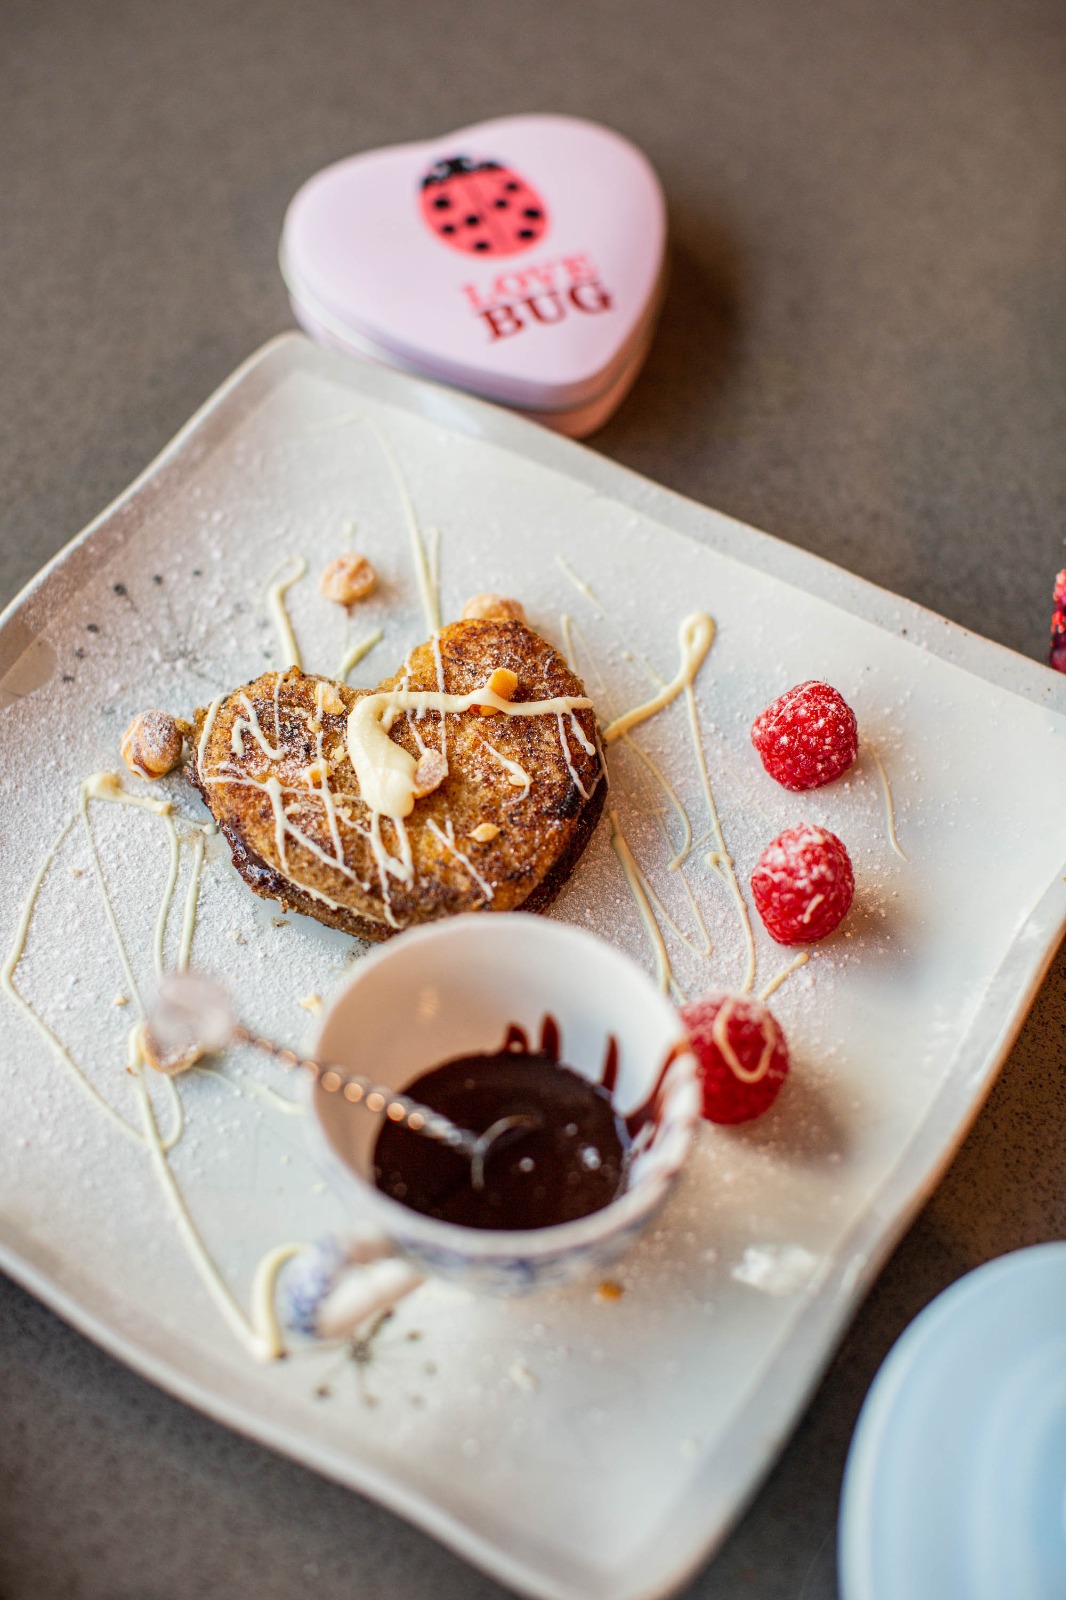
  • Transfer to your serving plate (s), add raspberries and chopped hazelnuts and sprinkle with icing sugar .

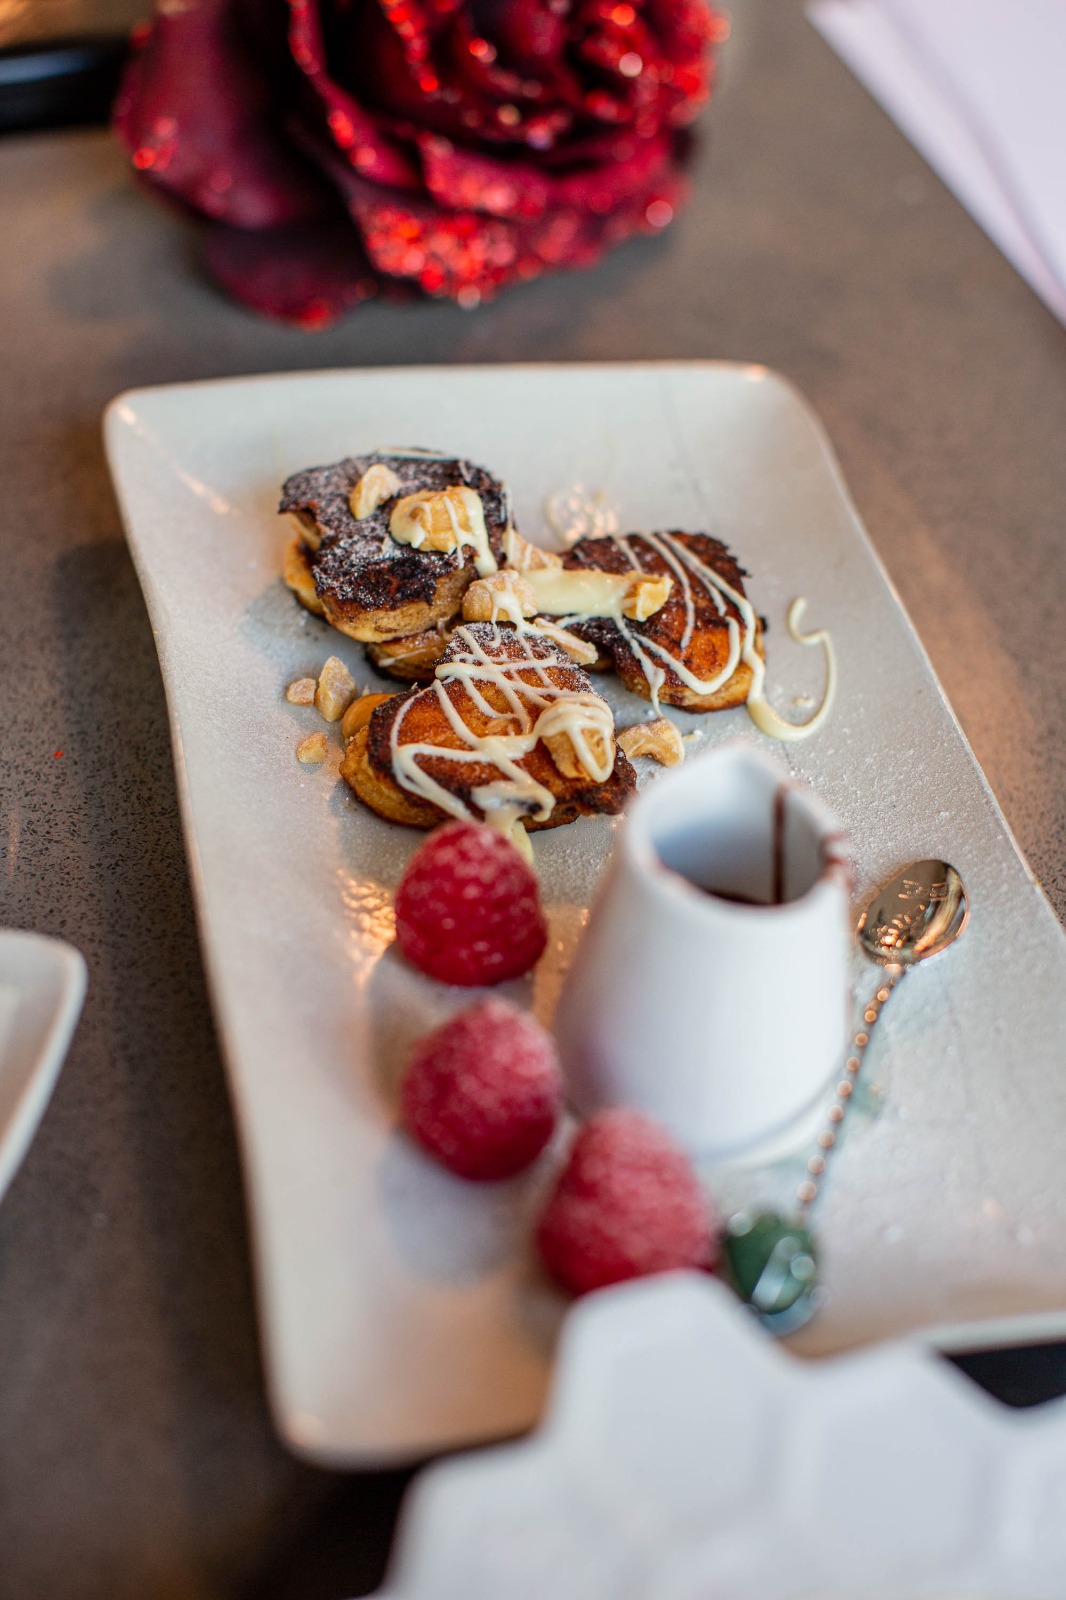
Your romantic breakfast is now ready to present to the object of your affections….. Enjoy 😘

cutting the toast

Happy Romantic Cooking!

Yvonne xx

If you’d like to join the weekly Hey Pesto! cookalong or attend one of my online cookery classes then please click here  for details. 

Special thanks to Jeff Harvey for the great food photography📷

Baking, Catering, Christmas, Cookery Classes, Cooking, Food, Recipes

Christmas at Hey Pesto!

I love Christmas – especially the build up and the anticipation, and of course the food!

It’s a busy time in the Hey Pesto! kitchen so my blog has been a little neglected so I thought I should do a quick update.

We’ve had great fun with our Christmas demos complete with chocolate cottage construction challenges which were great fun !

Chocolate cottage
Chocolate Challenges

By the way we have one more evening class on Tuesday 8th if you’re looking for inspiration for Festive Party Food!
Continue reading “Christmas at Hey Pesto!”

Baking, Cakes, Cookery Classes, desserts, Recipes

Happily Ever After Tart

Now that January is over and we’ve all been good and stuck to our resolutions to eat healthier (what do you mean you haven’t??)  it’s time to start thinking about treats for Valentine’s Day.
And speaking of resolutions it’s high time I stuck to mine and updated my blog.

I’ve been doing some research on aphrodisiacs in advance of my Valentine’s cooking and I’m now a font of trivia!

Did you know that basil was used for seduction by women in Moldova? Or that Catholic priests in Spain banned avocados because they found them obscenely sexual? Continue reading “Happily Ever After Tart”

Baking, Cookery Classes, desserts, Food, Recipes

Sammy the Spider

Have I mentioned that I love the variety of what I do -from catering to canapés to classes?

One of my latest ventures is Chocolate Cookery Classes at the famous Butler’s Chocolates.

So when they asked me to do a Halloween class I had to put my thinking hat on and Sammy the Spider was born …..

Meet Sammy! Meet Sammy!

To make this cake and be the star of your Halloween Party just follow my instructions which I hope don’t ramble too much…..

The body of the cake is made using one of the most versatile chocolate cake recipes you’ll ever need. I was introduced to it about 10 years ago by Tess and Nicola when I worked in Wicklow and since then I’ve used it for cakes, muffins, mini cupcakes, sweet canapés …..and now spiders.

What you need :

  • 8oz/200g Self raising Flour
  • 9oz/225g Soft Brown Sugar
  • 2o/50g Cocoa Powder
  • 1/4 pt/125ml  Milk (the full fat variety please!)
  • 1/4 pt/125ml  Sunflower Oil
  • 3 eggs , separated

What you do:

  • Preheat your oven to at 180C /170 C  Fan/Gas 4
  • Mix the dry ingredients in a bowl.
  • Mix the milk and oil in a jug and whisk in the egg yolks.
  • Whisk the egg whites until they’re thick and glossy (as if you were making meringues).
  • Add the wet ingredients to the dry, mix well and then fold in the egg whites – being careful not to knock out all the air.
  • And that’s it ! Now pour mix into baking tins – I used two 11.5 cm  and one 20 cm- you could make 2 large cakes or 4 small ones.
  • Bake for 12-15 minutes, until firm to touch.
  • Leave to cool in the tin for about 5 mins then turn out onto a wire rack  and allow to cool completely.

Note:  It’s not worth halving the recipe to make just one small cake so freeze the extra cakes for     another day – or make a family of spiders!

Now comes the fun part – the decorating.

First you need some Chocolate Ganache:

To make this you simply heat 200ml  cream until simmering then pour over approx 125g dark chocolate chips and stir until melted. If you think it’s not thick enough you can add more chocolate but do remember it will thicken as it cools.

Place on of the 11.5cm cakes on your serving plate (you can do it on a turntable but you have to be very careful when transferring it to its final plate!)

Cover the body of the cake with the ganache then get ready to add the legs. I used wafer rolls for the legs though I think chocolate fingers might work as well. wafer rolls

You need 16 rolls – two for each leg to allow for the bend! Cover each roll in the chocolate ganache (Didn’t I warn you it could get messy!)

Stick 8 of them into the body of the cake to form the tops of the legs. Then carefully ‘glue’ on the bottom half of each leg (wafer) using more of the ganache. (I’ll repeat the picture so you can see what I mean – I hope!)

halloween 020

For the face you need some roll out icing – white for eyes, orange for mouth. Stamp out two white circles for the eyes, ‘glue’ onto the body and then attach an M&M’s to each circle with a little of the ganache.

To make the mouth cut out a smile from the orange icing and stick it on.

Et voila! Your Halloween spider cake is complete  and totally worth the mess!

Happy Cooking & Happy Halloween!

PS the best compliment I received on this was from my soon to be 3-year-old nephew – he wants a spider as his birthday cake 🙂

Baking, Cakes, desserts, Food, Recipes

Love is in the Air

My poor blog has been very neglected of late so it’s time to pay it some attention and share a recipe for Valentine’s Day.

In preparation for my ‘Cupid’s Cookery‘ class last week I did a little research on aphrodisiacs and found lots of trivia. Did you know that basil was used for seduction by women in Moldova? Or that Catholic priests in Spain banned avocados because they found them obscenely sexual?

Other reputed aphrodisiacs are honey, almonds and chocolate – so what better way to celebrate St Valentine’s Day than to present the object of your affections with a combination of all three?

This recipe is based on one I found in the course of my research….I’ve made a few alterations and  I hope you like it……

What you need:

  • Heart Shaped loose bottomed tin
  • 180g dark chocolate digestives
  • 60g butter
  • 2 tbsp. flaked almonds
  • 200ml Avonmore Fresh Cream
  • 3 tbsp. Limefield Honey
  • 300g dark chocolate (70% cocoa), in pieces
  • Generous splash of Cointreau! 

What you do:

  • Crush the biscuits finely and add in the melted butter. Then press into the bottom of heart shaped tin.
  • Toast the almonds in a dry pan.
  • Whisk the cream and honey together in a small saucepan over a low heat and then slowly bring the mix to just below the boil.
  • Pour the mix over the chocolate and stir until the chocolate melts.
  • Stir in the toasted almonds and the Cointreau.
  • Pour the mix into the lined tin and leave to chill for a few hours until set (overnight is best)
  • Decorate to your heart’s content with almonds, hearts and sparkles!
  • Serve with lots of extra Avonmore Fresh Dessert Cream

    chocolate heart -001

I also made individual ones for last week’s date night  – one with added sea salt which I preferred but The Chief Taster preferred the Cointreau version!

P1010210-001

Did it live up to expectations? Well, let’s just say there were no complaints ……

Happy Cooking!


Baking, Cakes, Christmas, Cooking, desserts, Food

Extremely Chocolatey Christmas Wreath

It’s beginning to feel a lot like Christmas around here – the tree is up, the lights are on and I’m doing up my Christmas menus which will include this Christmas Wreath Cake as an alternative to the traditional fruit cake

I may have mentioned that I’m not really a dessert person – give me savoury any day – but I love making desserts and watching others enjoy them! I came across this wreath cake a few years ago – in a copy of Good Housekeeping I think – and have been using it every Christmas since.

I should warn you that this is a cake for serious chocoholics and not for the fainthearted, but it makes a great centrepiece on Christmas Day!

It’s an easy cake to make and it freezes well (un-iced ) so you can make it in advance and take it out to decorate on Christmas Eve.

The only special piece of equipment you will need is a ‘wreath’ tin i.e. a 23cm spring form cake tin with a but missing in the middle! I use one I bought in  Ikea  but  I know my local  shop ‘Kit Your Kitchen‘  now stock similar .

Turn your oven to 180 C or Gas 4 before you start and grease your tin with butter.

What you need:

  • 1 * 400g tin of pears (in natural juice)
  • 50 ml milk
  • 1 tbsp.  espresso coffee
  • 1 tbsp. vanilla extract
  • 1 tbsp. vegetable oil
  • 175g cocoa (I use Green & Black ‘s)
  • 125g plain flour
  • 1 tsp. baking powder
  • ½ tsp. baking soda
  • ½ tsp. salt
  • 340g caster sugar
  • 6 egg whites
  • 250g crème fraîche
  • 175g dark chocolate (I use 70% )
  • Christmas decorations

What you do:

  • Drain the tin of pears and whizz in food processor to a purée.
  • Mix the pear purée with the milk, espresso granules, oil and vanilla extract.
  • In another bowl mix together the cocoa powder, flour, baking powder, baking soda and salt.
  • Whisk the egg whites and the sugar together at high speed until stiff and glossy
  • Add in the pear purée mix  to the eggs and whisk slowly to blend
  • Finally fold the flour mix into egg and pear mix.
  • Spoon the batter into the prepared cake tin and bake in your preheated oven for 30 mins or until firm to touch
  • Allow cake to cool slightly in tin before turning out onto rack.

Cooling

  • As I said, if you’re making this ahead of time , you can freeze it at this point. Just make sure you wrap it carefully!
  • The icing is very simple : heat the crème fraîche in a bowl over a pan of simmering water.
  • Then remove from heat and add in chocolate. Allow to melt and then mix in until smooth.
  • Place pieces of parchment paper under the cake to protect your cakeboard/plate. Then using a palette knife spread icing over the cake . Remember you want it to look like a wreath so it doesn’t have to be smooth

christmas 11 006-001

Then it’s time for your (or your children’s ) imagination to take over…..

You can make chocolate leaves …..

christmas 11 008-001

…. use sprinkles ….Santas…..Robins….Snowmen……..

christmas 11 012-001

P1010008-001

……whatever you like!

But whatever you decide please be warned that this cake is INCREDIBLY rich and a little goes a long way!

Happy Cooking! 

PS I have been known to make this into an Easter Cake by covering it with flowers and mini eggs – you see a cake’s not just for Christmas!

Baking, Cakes, Catering, Christmas, Cooking, Food, Recipes

When is a recipe a family recipe?

When is a recipe a family recipe?  Does someone in your family have to develop the recipe from scratch or can it be a recipe that is used a few times and then becomes a family favourite?

I’ve been involved in several conversations on this topic and my maths brain tells me that there has to be a finite (albeit large)  number of recipe combinations so there are bound to be duplicates making it harder to credit the original originator of a recipe!

I believe that recipes  evolve  through sharing and experimentation. I have scraps of paper from family and friends glued into my recipe notebook  including a very precious  one dictated by my late Grandmother for her famous brown bread – once I figure out how much is in a ‘handful’ I’m sure it will work…..

I have a ‘to try’ box filled with recipes cut  from magazines and papers that I want to try …..someday

I have a vast collection of cookbooks that I love to cook from – but more often than not I’ll change something as I’m going along.

Don’t you hate it if  you  ask somebody for a recipe and they refuse to share it as it’s a ‘family secret’?

I make a lot of Chocolate Roulades – in fact it’s one of my main desserts. I love making a mini version to go on a mixed dessert plate.  I was given the recipe by the lady who owned the catering company I used to work for. I changed the quantities slightly to make it work in a bigger tin., and added the brandy! Years later I came across practically the same recipe in one of the Avoca books – so does the recipe belong to the person who first gave me the recipe, to the author or to me ???

I hate to think of myself as possessive so I’m more than willing to share this wonderful recipe, whoever it  actually ‘owns’ it.  I hope you like it.

What you need:

  • 6 large eggs, separated
  • 6 oz/175g dark chocolate
  • 6 oz/175g  caster sugar
  • 3 fl oz/ 75 ml brandy
  • ½ pt /300ml cream, whipped

What you do:

  • Melt the chocolate with the brandy, either slowly in the microwave or in a bowl over a saucepan of simmering water.
  • Whisk the egg yolks and sugar together until you get to the ‘ribbon stage’ – you really need an electric whisk for this unless you have really strong arms!
  • Fold in the melted chocolate into the egg mix. Then in a clean bowl whisk the egg whites until stiff (the egg whites not your arms!)
  • Using a metal spoon fold the egg white in stages into the chocolate mix. Then pour into a lined large Swiss roll tin
  • Bake at 180 C/Gas 4 for 12-15 minutes, until firm to touch.

Leave to cool completely

  • This is the important bit – cover with a damp towel and leave to cool completely
  • Dust the top of roulade with icing sugar and invert onto parchment paper.

  • Spread the cream evenly over the surface (feel free to add fresh berries as well)

  • Using the parchment paper to help  roll it up like a Swiss roll

  • Decorate the roulade with icing sugar and strawberries or grated chocolate

  • Serve and watch it disappear!

PS This works really well as a Christmas Log – decorate it with chocolate leaves and a robin – or lots of chocolate bark and sprinkles!


Anybody else got a favourite recipe they’d like to share ?

Happy Cooking !

Baking, Cakes, Catering, Cooking, Food, Recipes

Chocolatey Caramelly Cheesecake

Did I mention I’m not a dessert person? I know this may place me in a minority but in my defence I do enjoying making them for others. And sometimes I even find a recipe that tempts me to have a sliver……

I knew once I saw the Peanut Caramel Cheesecake in Good Housekeeping’s ‘Chocolate Collection’ that it was going to be one of those recipes destined to become a firm favourite. I tried it out for a family occasion but never got to taste as much as a crumb – which is always a good sign.  Then I did it for as part of dessert buffet and had several requests for the recipe.

So when some of my college friends came for a barbeque last weekend (and yes we did get to eat outdoors –  without fleeces and raingear!) there was no question about what I was doing for dessert! And it was a HIT!

I have made one or two changes to the original recipe including leaving out the peanuts in my last version cos I’m always worried in case someone has a peanut allergy. I hope you like it…..

What you need: 

  • 150g dark chocolate digestives
  • 50g butter, melted
  • 500g Philadelphia ( the full fat version please)
  • 1 tsp vanilla extract (vanilla paste would be even better ..)
  • 3 egg whites
  • 175g caster sugar
  • 50g dark chocolate ( I use 70% ) , chopped
  • 60g dried pineapple pieces *
  • 2-3 tbsp of Ballyshiel dulce de leche

in the original recipe this is 75g salted peanuts

What you do:

  • Line a 22cm springform tin with butter and baking parchment.
  • Crush the biscuits in a plastic bag using a rolling pin. Mix the crushed biscuits and melted butter together and press into the base of the tin.
  • Whisk the cream cheese with the vanilla until smooth and creamy.
  • Then (in a spotlessly clean bowl) whisk the egg whites to stiff peaks. Gradually add in the sugar to form a glossy meringue like mixture.
  • Carefully fold the meringue mix into the cream cheese using a metal spoon.
  • Then fold in the chocolate and pineapple into the mix.
  • Finally swirl in the dulce de luche and pour the mix onto the biscuit base.
  • Leave cheesecake to set in fridge overnight – or if you’re in a hurry pop it into the freezer for a few hours.
  • Remove the cheesecake from the tin and topwith more dulce de leche and grated chocolate…….
  • Serve and watch it disappear!

I dare you not to come back for a second slice!

Happy Cooking !

Cooking, Food, Recipes

Dining á deux – Romance is in the air!

Romance is definitely in the air and what better way to celebrate than with a delicious dinner á deux?

This was my Valentine’s meal last year but looking at the dishes I think it deserves another outing……….. see what you think!

Starter : Seductive Scallops on a Pea & Mint Purée

According to my fishmonger, Jason, this dish cannot fail to stir the romantic juices! You can make the purée in advance and reheat just before serving. The trick is to have everything ready before you cook the scallops as they are best served immediately. Allow 3 scallops per person.

To make the puree – heat 125 g frozen petits pois, knob of butter, 50 ml chicken stock andseasoning in a small saucepan and alllow to simmer for 3-4 mins. Then whizz in food processor with a small bunch of mint (chopped) and Voilá!

To cook the scallops make sure your pan is red hot, add a little butter and oil, and sear the scallops (seasoned with little salt & freshly ground cumin) for 1 min each side. You want a nice caramelised colour.

Serve the scallops on a dollop of purée with salad leaves drizzled with balsamic vinegar.


Main: Romantic Roast Duck Breast with Plum Sauce

I used the frozen Barbary duck breast from Lidl for this – one at €5.99 is enough for two! (I hope they still have them!)

Again you can make the sauce in advance and reheat when needed. To make the sauce sauté 1 chopped shallot in a little olive oil for a few mins. Add 250g red plums (half a punnet), stoned and cut into wedges alond with 50g demerara sugar and stir til the sugar dissolves. Finally add 50 mlred wine and 300 ml beef stock and simmer until the sauce has reduced and thickened (should take about 15 mins)

Turn your oven to 180C /Gas 4.

To cook the duck – score the skin with a sharp knife and season well. Place the duck breast(s), skin side down, on a cold pan and bring up to temmperature. (this will stop your meat seizing up ) and cook for 6 mins. Then turn the duck over and add 25g butter, 1 star anise and a sprig of thyme to the pan. Baste the breast(s) with the juices and then transfer to pre heated oven (check your pan is oven proof, if not transfer duck to roasting dish!). Roast for 5-6 mins for pink or 10 mins for well done. Baste the duck with the juices and allow to rest for 5 mins before carving.

Serve the duck breast on a bed of mash with plum sauce spooned around.

Dessert: Decandent Chocolate Cocktails

This  rich, luscious chocolatey dessert looks really well served in martini glasses.

Mix 2 tbsp of your liqueur of choice (I used Cointreau but I want to try Mint Baileys…) into 170ml ofdouble cream. Remove 3tbsp of the cream mix and reserve for later. Then heat the remaining cream in a small saucepan until just boiling.

Pour the hot cream over 50g dark chocolate pieces (70% cocoa please!) and stir to melt the chocolate. Divide the mix between 2 martini glasses and allow to cool.

Whip the remaining cream and spoon over the chocolate ( think a pint of guiness!). Then allow to chill in the fridge for at least an hour before serving.

Timing

To make sure your meal flows smoothly make the dessert, pea purée and plum sauce in advance. You could also make the mash a little ahead of time if you want.

Set your beautiful romantic table, make yourself beautiful/handsome. Pour the champagne.  Then return to cooker and sear the duck (I advise wearing an apron for this part!). When you have transferred the duck to the oven, cook and serve the scallops.

Allow the duck to rest while you reheat the sauce and the mash – plate it up and enjoy.

All you need to do with the dessert is dust with cocoa – using a heart stencil of course.

Now the rest is up to you………………

Happy Cooking!

Baking, Cakes, Cooking, Food, Recipes

Heart’s Desire Cake

So it’s that time of the year – Valentine’s Day or should I say the ultimate Hallmark day! Time to bring out your inner romantic and make everything pink and heart shaped……..

And if my black pudding starter seems very ‘hearty’ well here is the ultimate chocolate cake to finish off your romantic meal á deux! (what you choose to have for main course is entirely up to you………….)

I came across this recipe when I was putting together a ‘Cupid’s Cooking’ class last year and it went down very well. I think it came from Delicious Magazine so I hope they don’t mind my variation on it!

It’s quick , easy and delicious so go on, give it a try………..

Heart’s Desire Cake

Preheat your oven to 180C/Fan 160C/Gas 4.  You’ll need a loose bottomed heart-shaped tin – I got mine from Kit Your Kitchen last year and I’m sure Gemma will have some  in stock this year

What you need:

  • 150g butter
  • 1 tsp vanilla extract
  • 150g dark chocolate (70% cocoa) buttons
  • 140g light brown sugar
  • 130g caster sugar
  • 3 eggs, beaten
  • 150g plain flour
  • 50g hazelnuts
  • 50g Green & Black’s butterscotch chocolate

What to do:

Put butter, vanilla, chocolate and sugars into a bowl

Place bowl over a saucepan of simmering water and heat  until melted.

Remove bowl from heat, add in the beaten eggs and fold in the flour

Finally stir in the chopped hazelnuts and butterscotch chocolate.
Pour the cake mix into a buttered, heart shaped tin and bake in a preheated oven for 25 mins until top is firm to touch but cake is still squidgy inside.

Allow to cool in tin for 15 mins before carefully turning out onto serving plate.

A few bits from my decorating box…

Decorate to your heart’s content ……

and serve warm with whipped cream and lots of love……..

Did I mention I had a very interested observer while all this was going on….

Happy Cooking !

PS Valentine if you’re reading this, I have the cake so  flowers or jewellery will do……….